
How to Add Watermark in Lightroom?
Wanna add a watermark in Adobe Lightroom photos? Not a big deal. Follow the instructions
In the Top Left of the Lightroom, Under the share button, you will find a Custom Setting. There is an option called Include Watermark. Some people want it and some don’t. People who want watermark on their pictures, mostly do this because they want to endorse their brands or promote their companies.
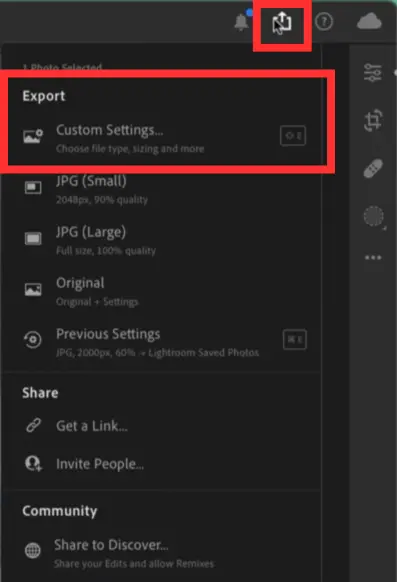
Moving forward, you have a clear option for adding watermark to your pictures.
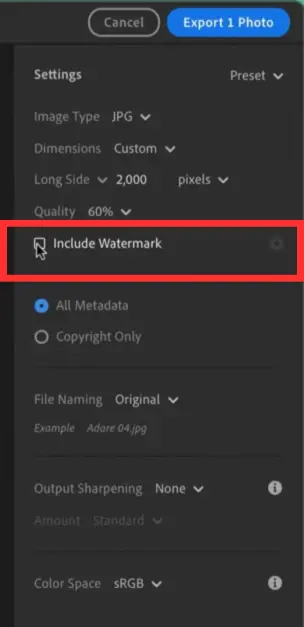
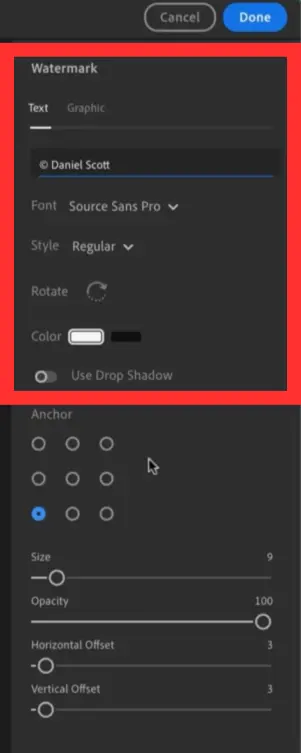
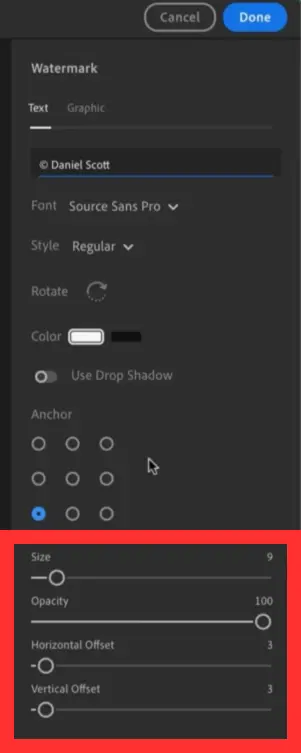
When you click for “Include Watermark”, there will be so many customization options for watermark. In the first place, you will have the option to write the text whatever you want as a Watermark Tag. Then, you have a list of Fonts which is quite a representation of true freedom of customization in Lightroom. Not only this you will be provided with the option of Style, Rotate & Color and “Use Drop Shadow”; what type of Style you want, either you want to rotate the watermark or how much rotation you want, which color you want the watermark in, or wanna add shadow to the watermark or not. Moreover if you want appealing, modern, unique and diverse range of Presets, our website provides you that too.
Remember: As long as the blue tick is there before the option “ Include Watermark”, there will be Watermark on the picture.
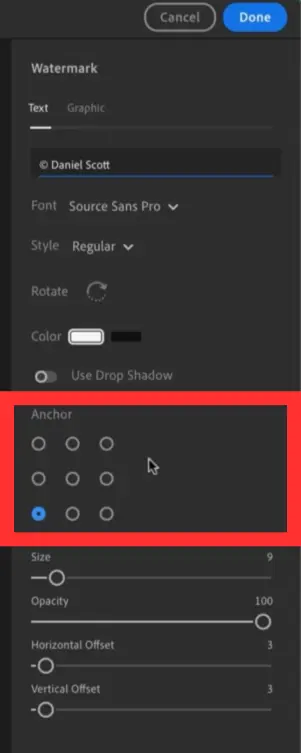
Now comes the Anchor, which means the position of the watermark. You have 9 options of positions; Three Rows and Three Columns:
- Top Left, Top Middle, Top Right
- Middle Left, Middle, Middle Right
- Bottom Left, Bottom Middle, Bottom Right
Now comes the Size, Opacity, Horizontal Offset, and Vertical Offset. That’s what the need of the people is to have the full control of the customization in their hands. Want to Increase or Decrease the size of the Watermark Text, How much the prominence of the Watermark text should be; Opacity, Horizontal Offset and Vertical Offset also indicates the position of the text horizontally and Vertically.
Remember: If you set the position of the Watermark to the Left or Right, you can have access to Horizontal position adjustments but if you set the position to the Middle, you will not have the horizontal adjustment feature. Moreover, if you want to get back to the normal settings, just double click on the adjustments.
Add Graphic as a Watermark
There is an option “Add a Graphic” to add any picture in the place of Watermark. Click this option, a Small Box/Panel will pop up from where you can select your desired Picture as a watermark.
Recommendation: Select the picture that is PNG format because it has No/Transparent background which looks nice as a watermark. The same settings are available as are in the Text Watermark. Rotate, Anchor ( to select the position of the watermark), Size, Opacity, Horizontal Offset and Vertical Offset. They play the same function as in Text Watermark. When you are done with the Watermark Settings, Click Done.

Add Watermark in Mobile
If you want to add a watermark in your Lightroom Mobile, you just need to open the picture you want the watermark on.
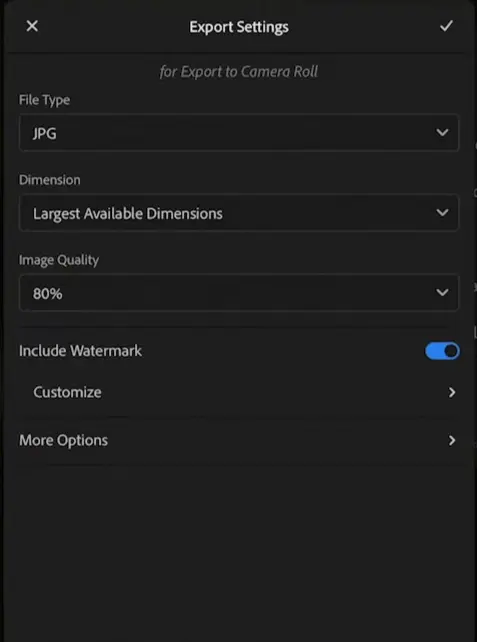
Make sure the Watermark option is checked. Moving on, you need to go to Customize, there you will have two options same as in Lightroom PC.
- Text
- Graphic
If you want a Text as a watermark, go for the Text Option but if you want a Logo or a picture as a watermark, go for Graphic Option. In both of these options you have almost the same setting like Rotate, Fonts, Size, Opacity, Horizontal offset and Vertical Offset.

Recommendation: Make sure if you add a picture or text as a watermark, the picture behind doesn’t lose its attention. In order to do this, keep the Opacity lower
When done, go back and Click Export to Camera Roll.
This process will be automatically applied to every image you export. So if you want a watermark or not, just make sure the “Include Watermark” option is checked or unchecked according to the requirement.
If you want to learn about Lightroom mod apk, you can do that too.


