Easy Techniques to Learn How to Batch Edit in Lightroom
Almost seven simple and easy techniques and their complete guides that help you learn batch editing in Lightroom. Here are the techniques given below:
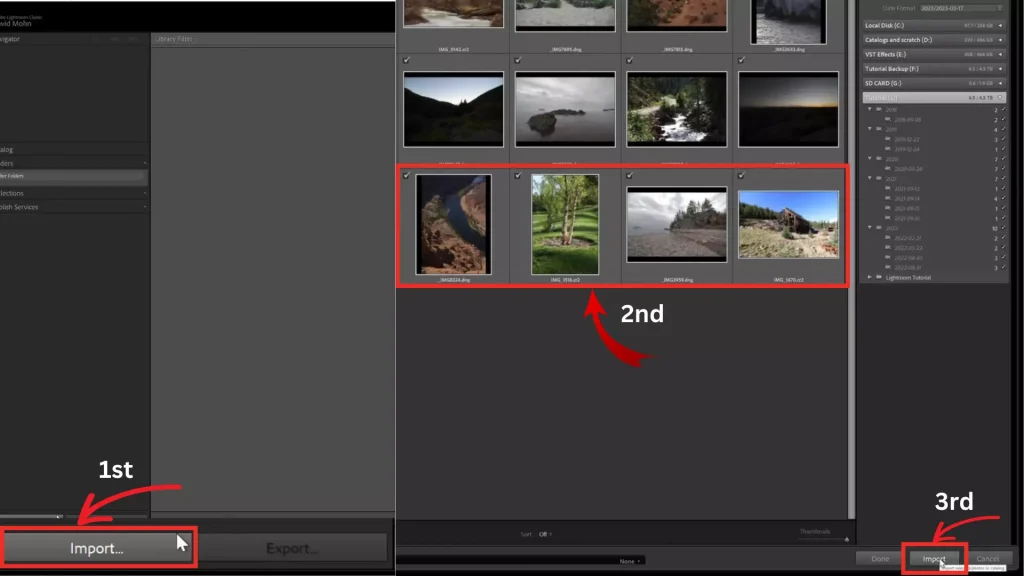
Importing Images
Before editing, you must import the images into Lightroom.
Step 1: First, install the Lightroom and open it.
Step 2: After opening the application, tap on the import button, which you’ll see on the bottom left. Once it’s open, you’ll see a navigate folder where your pictures are stored.
Step 3: Select the folder, single picture, or multiple pictures you want to import. Pictures will appear when you select them in the importing module.
Step 4: You will see an Import button on the bottom right after selecting the photos.
Step 5: Tap the Import button. Now, selected pictures will appear in Lightroom.
Library Module
- Step 1: Tap the import button and select all photos you want to batch edit in groups for import to the library.
- Step 2: After importing the selected pictures into the library, you can edit them in small batches.
- Step 3: To edit them in small batches, select the first image, press the CTRL key, and hold down to select all other images.
- Step 4: After selecting all the images, apply a preset.
- Step 1: To switch to the “Develop module,” you will see a “Develop” option at the top right of your screen. Click on this option.
- Step 2: After clicking on this option
- Step 3: Select one photo or multiple photos you want to do batch editing.
- Step 4: The Quick Develop panel has three main sections, Saved Preset, White Balance, and Tone Control, that help with desired editing.
Previous Edits
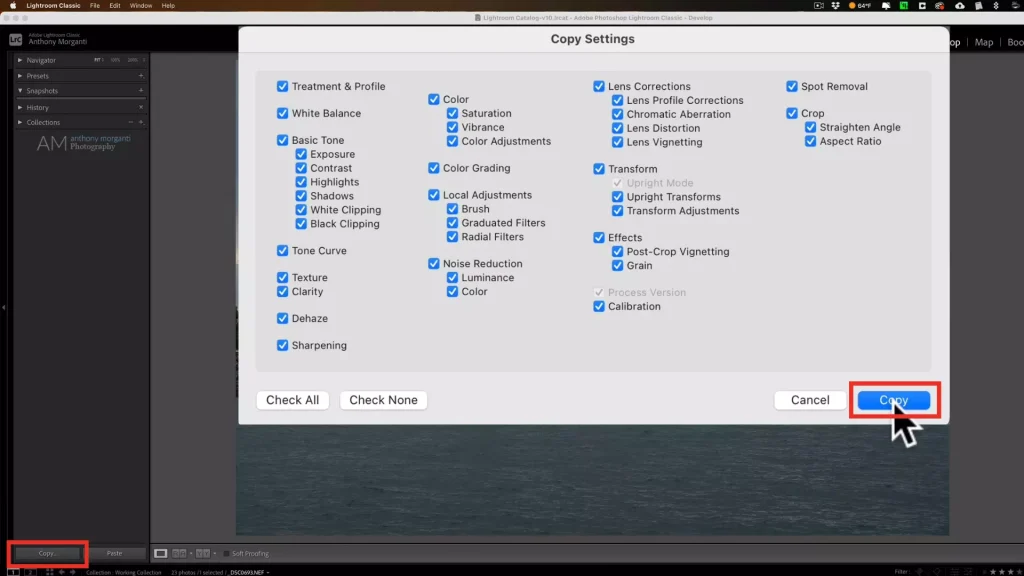
- Step 1: Select a photo you want to copy in the edit settings.
- Step 2: Right-click on the selected image, select settings, and copy settings.
- Step 3: The dialog box will show on your screen after tapping this.
- Step 4: You’ll see all your edits or adjustments.
- Step 5: Select the recommended edits you want to use on other photos.
- Step 6: Copy the edits and move back to the Library module.
- Step 7: Select the specific or multiple photos for which you want to apply the same edits.
- Step 8: Paste the previous photo edits here after selecting the photos.
You can also use copy-and-paste commands to make this easier.
- Command for Copy: Ctrl+C
- Command for Paste: Ctrl+V
Own Preset
Now, we discuss one of the easiest batch edit techniques called preset batch editing. To use this technique, you need to create your own preset. To create your own preset, first find the preset panel. To find this panel and for using this easiest technique, follow the steps below:
- Step 1: You can find this panel in the right side toolbar.
- Step 2: A “+” sign will appear on the top right after finding this panel.
- Step 3: Click on this “+” sign to create a new preset.
- Step 4: After clicking on this sign, you will see all the relevant adjustments.
- Step 5: Copy the relevant edits which you want to preset.
- Step 6: Now, you can apply the preset on the images inside your Library.
- Step 7: Select the specific or multiple photos for which you want to apply the same edits.
- Step 8: Paste the previous photo edits here after selecting the photos.
Sync Setting
Now, we discuss another batch edit technique, which is the same as the copy-and-paste technique. This feature lets you quickly sync batch edits to other pictures, like the copy-and-paste technique. When you select different pictures, sync and sync setting buttons will appear at the bottom right.
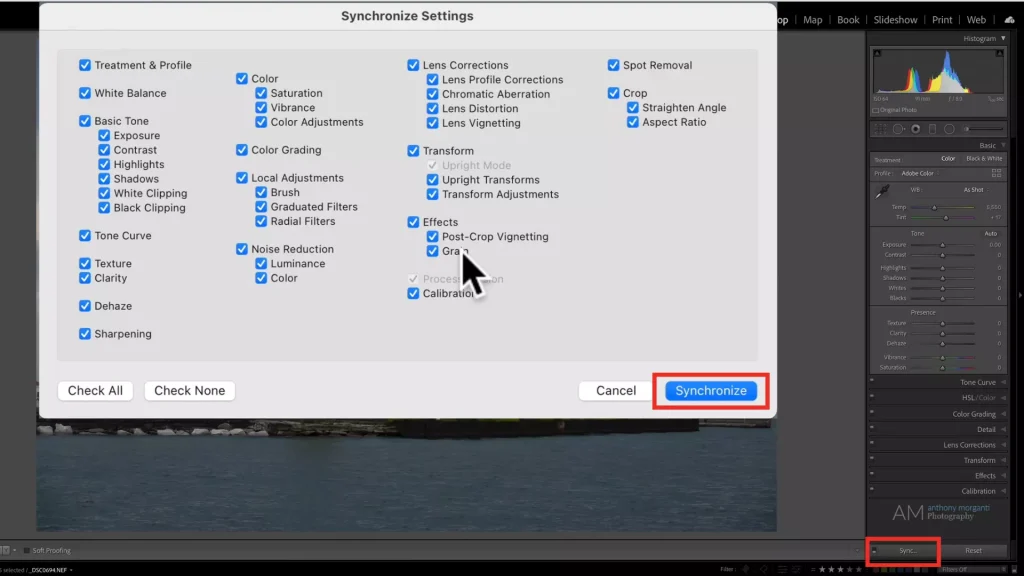
- Step 1: First, select the edited pictures in the Develop module.
- Step 2: To select the different pictures, tap the sync button, and a new window will appear.
- Step 3: You’ll see all the adjustments.
- Step 4: Select the adjustments you want to sync with other photos and click on synchronize.
- Step 5: After synchronizing, the sync setting will apply to all the selected pictures.
Metadata
Now, we discuss one of the metadata batch edit techniques. This feature is very helpful for photographers who want to organize their library. Lightroom makes a metadata preset that you can paste on the other group of photos. When you take pictures, Metadata information, such as capture date, time, color setting, and more, is automatically recorded in a photo.
- Step 1: Go to the Library module and select the multiple pictures you want to edit in the Metadata base.
- Step 2: To find the Metadata option, go to the Library module, scroll down, and a panel will appear on the right-hand side.
- Step 3: You’ll see a metadata section in this panel.
- Step 4: Click “New,” and a new window containing metadata options will open.
- Step 5: Make the necessary changes. When you’ve done so, click on the “Done” button and create your preset name.
- Step 6: Select various images where you want to apply the changes.
- Step 7: To apply these changes to all the selected pictures, you can use the “Sync Metadata” option.
Auto Sync
Now, we discuss another batch edit technique next to the sync button: auto-sync batch editing. This feature allows you to edit various pictures. To do this, you need to move the slider into one image, and then the same edits automatically apply to the selected pictures. To learn the usage of this feature, follow the steps:
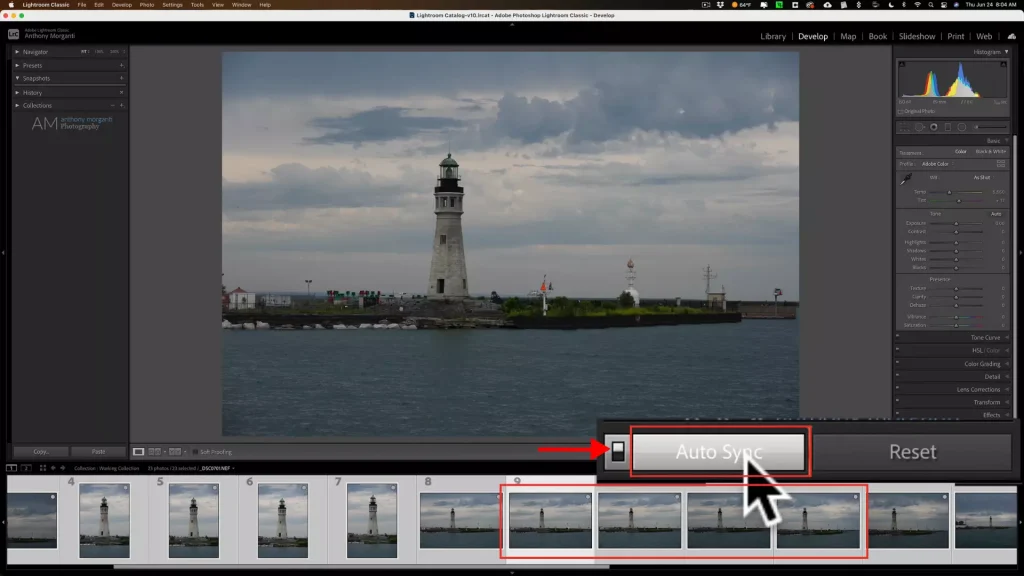
- Step 1: Click on the Develop Module you’ve seen at the top right of the screen, and then select a picture you want to edit.
- Step 2: Click on the toggle to switch on auto-sync. It is beside the sync button.
- Step 3: Edit your selected image.
- Step 4: These edits will apply to all selected images you want to sync.
Avoid Mistakes
- Ensures the first edits because any picture adjustment will apply to the selected pictures.
- Ensure that you’ve selected all the pictures that you want to synchronize.
Export Photos
After completing and finishing all the batch edits, you must export your edited images. You can easily export the images, print them, or share them with others. Follow the step-by-step guide to do this:
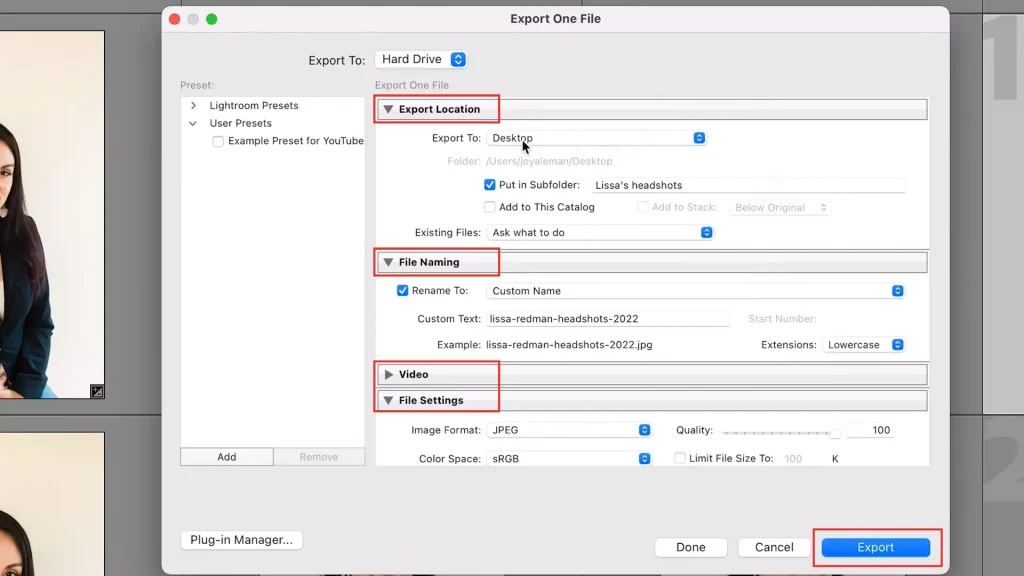
- Step 1: Go to the Library module and select the pictures you want to export.
- Step 2: After selecting the pictures, you’ll see an export option at the bottom left. Click on this button.
- Step 3: A new export setting window will appear after clicking the Export button.
- Step 4: Here, you can set the export settings, such as file formats, file names, file size, and location.
- Step 5: After finishing the export settings, click the export button.
- Step 6: Your pictures have been exported to the specified location.
Conclusion
We have discussed the various points or techniques of how to batch edit in Lightroom. You can use one of them to save time. This technique is especially helpful for those photographers who cover events, weddings, and shoots. So, let’s try these techniques. Happy editing!


![Frame.io C2C [Camera-to-Cloud] integration with Adobe Lightroom- New Update 2025 11 Lightroom Integration with Frame.io](https://lrrapk.com/wp-content/uploads/2024/08/Lightroom-Update-1-768x432.webp)
