How to Export from Lightroom to Instagram?
Every Social Media platform where you can post photos, they have a different set of rules for the pixels of the photos you have to follow. But let’s explore the technicalities and the rules of Instagram and find the best Lightroom Export Settings For Instagram for photos from Lightroom mobile or PC as per the requirements of Instagram. Although there are so many places you can post your photos, I personally prefer using Instagram for posting my photos because as per my experience Instagram is mostly used for photography and to showcase your photographic skills. Plus, you can also find out the Old Versions of Lightroom to go back to the past.
What are the best settings for the Export from Lightroom to Instagram?
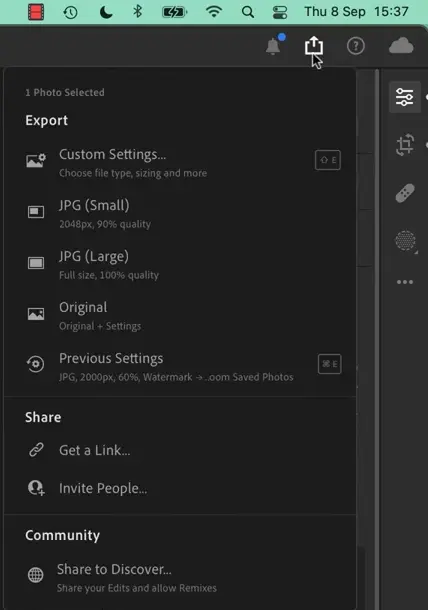
First you will see the normal settings of the Lightroom for the picture you opened in Lightroom. You just need to click the button in to top of the bar after which will pop up further settings. You need to Click Custom Settings from the Export Section. It will take you to the further setting where you will have the advanced settings of the picture regarding the exporting. For example: you can customize the File Type, Sizing, Dimensions and many more.
Now you are supposed to select from the two options: Long Side and Short side which are the size of the picture in terms of Horizontal and Vertical Size.
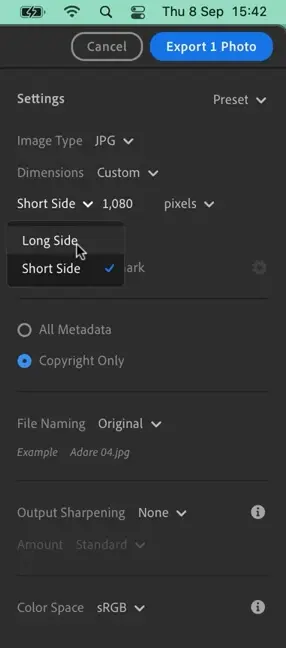
Short Side
Short Side feature is for the photos that are vertically longer and horizontally shorter. So, the settings vary from size to size
As far as the “All Metadata” or the “Copyright Only” settings are concerned, I would recommend you to go for “Copyright Only”. Because with the Metadata, all the things come with the photo like the location where the picture was shot etc.
Long Side
Short side feature is for the photos that are horizontally longer and vertically shorter.

Now you can Export your Image from Lightroom. Export means the picture will be saved with all the editing and settings that you made.
Settings should be the same for both the short side and long side. When you post something on Instagram, it also makes it even nicer by editing something by itself. But if you edit your pictures with Lightroom, it looks even more sexy and amazing. In case you find any problem as how to add a watermark in the picture while editing on Lightroom, you can also find the solution. The process is for all the Lightrooms; be it on your mobile or PC, the settings are going to be the same and the method as well. In addition to that, most of the people face the hurdle as how to update Lightroom Classic, Fret not, We’ve got you.
Conclusion
So, if you are looking to make your photos look even more beautiful after editing with Lightroom, you should go for Instagram. As far as Exporting is concerned, it’s not quite difficult. Just edit whatever you think is best and suitable to your photo and follow the settings that I told you above for both Short or Long side of the picture and apply settings for the respective photo as per the recommendation. This is the best export settings for lightroom mobile to Instagram
