Histogram
In Adobe Lightroom vs Camera Raw, the histograms are quite similar. To maximize their results, photographers should understand the Histogram first in Adobe Lightroom. The histogram shows how to distribute certain parts of your pictures, such as Highlights, Shadows, and Exposure.
The histogram works slightly differently between Lightroom Classic and Lightroom CC (Creative Cloud). To edit exact areas of pictures in Lightroom Classic, you can drag the histogram from the graph to the picture directly, but you cannot do this if you use Lightroom CC.
If you use the histogram in Adobe Camera Raw, you can drag the graph to the pictures as Lightroom Classic and change the picture if necessary.
Sliders
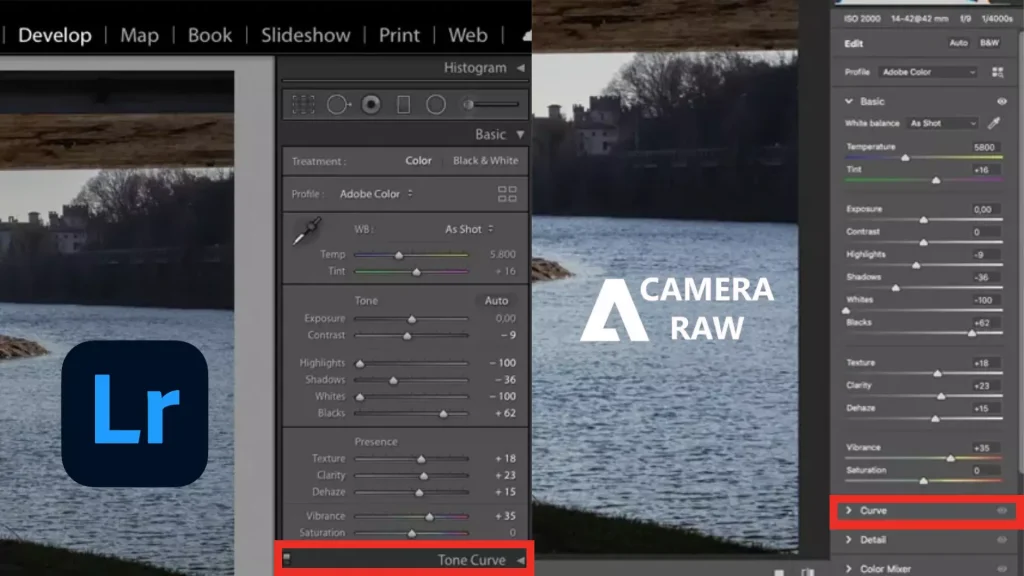
If you use Lightroom, you can see multiple sliders and use them to enhance your picture editing. Lightroom allows you to adjust a picture’s brightness using tools such as Exposure and Shadows. You can also use saturation and adjust Vibrance to make your pictures more interesting.
You can individually set the color’s hue, saturation, and luminance and make further changes using Adobe Lightroom’s calibration tool.
If you’re using Adobe Camera Raw, most sliders, like Lightroom, are listed in Raw Camera. You can easily add clarity and texture and adjust the exposure of your pictures. If you feel like adjusting the white balance of your picture, you can adjust the temperature and color of the picture to make it more interesting.
Color Grading
When you complete the first edits of your picture, you need to add the next set of touches, and many photographers want to change the colors of their pictures. The color grading feature has become one of the most popular features of Lightroom because it replaces fine-tuning and allows photographers to adjust the highlights, shadows, and midtones. Color grading tools allow you to change the color of your picture.
Adobe Camera Raw offers the same color grading tools as Lightroom, which shows the similarities between these two software programs. So, adapting is easy.
Tone Curves
Now, we discuss the Tone Curve, a powerful tool for adjusting the brightness of different parts of pictures. It can be found in Adobe Lightroom and allows you to add various effects, like an S-curve, to make the picture interesting.
You can also find the red, blue, and green graphs and customize everyone to your preferences to adjust the pictures. Camera Raw also offers this feature, which you can use as Lightroom.
Differences between Adobe Lightroom vs Adobe Camera Raw
In Adobe Lightroom vs Camera Raw, there are some differences between, and we’ll outline some of these below:
- Interface
- Workflow
- Advanced Search
- Batch Editing
Interface
At first glance, Adobe Lightroom and Camera Raw look similar. Still, when we open these software for work and examine their interfaces closer, we will notice a few subtle differences between them. There are various tabs to navigate. On the left sidebar, we can see our editing history, add presets, and navigate our editing picture.
At the bottom of the Lightroom Interface, we can see the other pictures we want to add to our Library. On the right sidebar, we can decide which picture to select for editing or see other imported pictures.
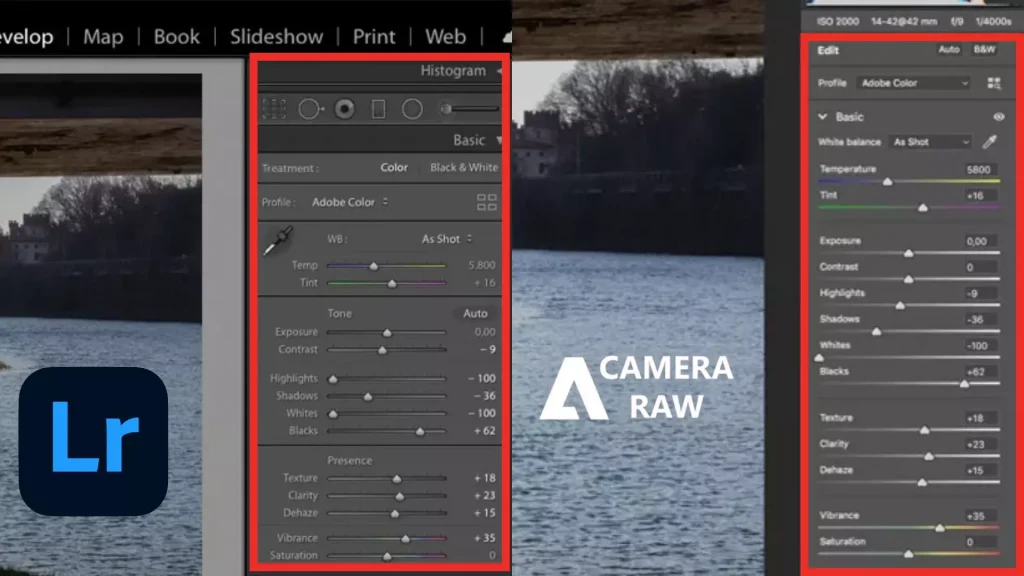
If we use Adobe Camera Raw, we see a different design and size of fonts and menus. We can not look at anything on the left sidebar. Here’s another difference in Adobe Lightroom vs Camera Raw: We see tools for healing, cropping, and so on under the histogram in Adobe Lightroom, but we can see these tools on a side in Adobe Camera Raw.
Winner of this Race: Adobe Lightroom
Workflow
Workflow is the main significant difference between Adobe Lightroom and Adobe Camera Raw. Lightroom is an asset management software that allows photographers to manage catalog-based assets. It is also a raw-feature photo editor. Adobe Camera Raw is built into Adobe Bridge, a raw-processing photo editor that allows photographers to browse their pictures.
Lightroom is well-experienced and focused software that starts by importing your pictures into its workflow. Adobe Camera Raw (Bridge) lets you find pictures from your PC or hard drives and start working on them. So, Lightroom is the best option for those photographers who want a more organized and straightforward workflow.
Winner of this Race: Adobe Lightroom
Advanced Search
When our photo gallery grows, we must organize it and keep everything in sequence. Sometimes, looking at our gallery as we want can take time and effort. In these situations, a good and advanced search function can help greatly. Adobe Lightroom is a powerful photo editor that organizes files and has advanced search functionalities, which is better than Adobe Camera Raw.
We can store our pictures for different projects in Lightroom, which is a much better option than Adobe Camera Raw because Adobe Camera Raw is designed for different purposes. We have already imported pictures into Photoshop and used this for Adobe Camera Raw with retouching.
Winner of this Race: Adobe Lightroom
Batch Editing
Another difference between Adobe Lightroom and Adobe Camera Raw is batch editing. Lightroom allows photographers to sync edits across all pictures easily. This feature is especially useful for photographers who cover events, shoots, or weddings and share tons of pictures with clients because it saves editing time and helps to share them with clients timely.
While batch editing in Adobe Camera Raw is possible, it’s much less sleek and efficient, so Adobe Lightroom is a better choice for photographers than Adobe Camera Raw.
Winner of this Race: Adobe Lightroom
Effective Use of Lightroom and Adobe Camera Raw
If you want to organize pictures in Lightroom and also want to access Adobe Camera Raw, so follow these steps to combine the workflow given below:
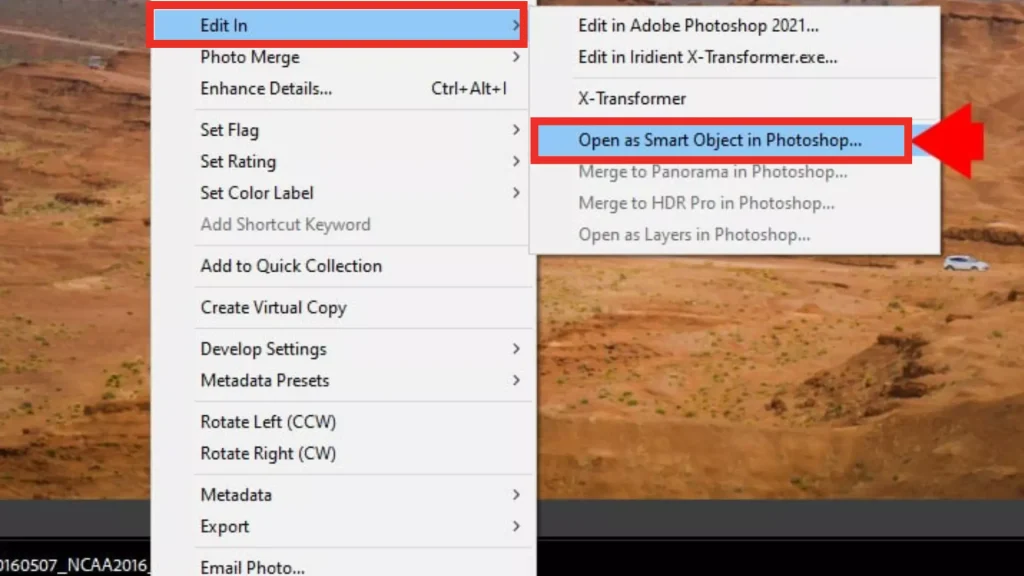
- Import images in Lightroom.
- Organize them and customize the basic adjustment in the Lightroom Develop module.
- Right-click on the image, then tap on “Edit In” > Open Smart Object In Photoshop.”
- Your file will open in Photoshop, and you can adjust it.
Conclusion
If we conclude this article, Adobe Lightroom and Adobe Camera Raw are powerful software with their strengths and weaknesses. It depends on which software suits your workflow and fulfills your preferences.
Lightroom is especially suited for those photographers who want to organize their workflow, and Adobe Camera Raw is suited for those who want flexibility in their editing work. In addition to that, Lightroom free premium app is getting famous for its paid features that are totally free and available to everyone.

